🏆 ProTips Premium Signal Guide — Official Member Manual
The complete handbook for reading, executing, and managing ProTips automated trading signals.
Welcome to ProTips, our premium prop-trading signal system. This guide walks you through every part of how signals are generated, broadcast to Telegram, mirrored to your Web Hub, and — most importantly — how to execute them with discipline.
ProTips does not run on opinion. Every signal you receive is the output of a Multi-Strategy Technical Consensus Network (5 premium indicators voting together) and a dual-AI moderation gate before a single character ever reaches the channel.
 ProTips Premium Branding
🏗️ System Architecture — How a Signal Reaches You
Every signal travels through the same quality pipeline before it appears on Telegram or the Web Hub:
Rendering diagram…
Three filters, one signal. A setup must (1) come from one of the 5 approved indicators, (2) survive the technical consensus engine, and (3) clear the AI council vote. Anything weaker is dropped before it ever reaches you.
📊 1. The Web Hub Dashboard
Every signal that passes the gate is mirrored to your member Web Hub at /signals. The Hub gives you:
- Live status of every active signal (Active / Won / Lost / Cancelled).
- Entry Zone band highlighted above the price grid so the split-fill range is unmistakable.
- AI Council footer showing each council member's score and one-line reasoning.
- Cross-Strategy Confirmations when two or more strategies converge on the same setup.
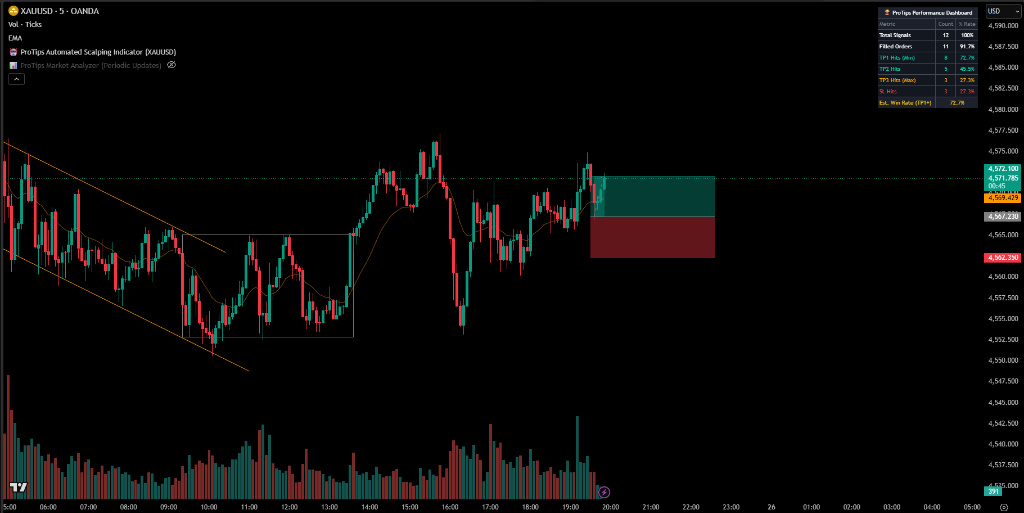 ProTips indicator + performance dashboard on TradingView
An example ProTips indicator running on XAUUSD M5 with the live Performance Dashboard panel (top-right).
ProTips indicator + performance dashboard on TradingView
An example ProTips indicator running on XAUUSD M5 with the live Performance Dashboard panel (top-right).
The Performance Dashboard panel tracks the indicator's own statistics so you can see real-time win rate, fill rate, and TP/SL distribution at a glance:
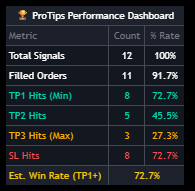 ProTips Performance Dashboard panel close-up
📢 2. Reading a Telegram Signal
When a setup passes every filter, you receive a structured HTML message in the Telegram channel. The format is fixed — once you learn it, you can scan a signal in under five seconds.
📝 Anatomy of a signal
🤖 PRO AUTOMATED SIGNAL 🔥 [HIGH CONFIDENCE]
━━━━━━━━━━━━━━━━━━━━
Strategy: ProTips FTR Confluence
Asset: XAUUSD (Gold)
Timeframe: M5 | Session: London
Direction: 🟢 BUY LIMIT

🎯 Entry Zone: 2422.50 – 2426.00
   Recommended: 50% market at 2426.00, 50% limit at 2422.50
❌ Stop Loss (SL): 2415.00

🎯 Take Profits (R:R measured to far edge):
├ 🟢 TP1: 2429.00 (RR 1:0.5)
├ 🟢 TP2: 2434.00 (RR 1:1.5)
└ 🟢 TP3: 2444.00 (RR 1:3.0)

🧠 Indicator Score: 82%
⚡ Confluences: BOS + FVG retest + London open momentum

⛓️ CROSS-STRATEGY CONFIRMATIONS
├ 🔗 ProTips Wyckoff VSA [Zone Confluence 🎯 & Time Aligned (12m) 🕒]
└ ⚡ Boosted Tech Score: 100%

🧠 AI Council: 78%
├ 🟢 AI #1: 82% — Structure intact, FTR retest with clean liquidity above TP2.
├ 🟡 AI #2: 74% — Setup is valid; reduced size recommended given session overlap.
━━━━━━━━━━━━━━━━━━━━
⚠️ Automated scalp signals. High volatility expected. Strict risk management (0.5–1.0% max risk).
🔑 Field-by-field reference
| Field | Meaning |
|---|---|
| Header badge | 🔥 [HIGH CONFIDENCE] when indicator score ≥ 85%, otherwise ⚡ [POTENTIAL]. |
| Strategy | Which of the 5 premium indicators fired this signal — see Section 4. |
| Timeframe / Session | Trigger timeframe (typically M5/M15) and active market session (London / New York / Asia). London + New York overlaps carry the highest reliability. |
| Direction | 🟢 BUY or 🔴 SELL, followed by order type (MARKET / LIMIT). |
| Entry Zone | A price range, not a single price. The zone covers 40% of the SL distance — see Section 3 for the split-fill execution. |
| Stop Loss | Hard SL. Do not move it further out under any circumstance. |
| Take Profits | Three partial targets with R:R measured from the far edge of the entry zone (worst-case fill). |
| Indicator Score | The originating indicator's own confidence (0–100%). |
| Confluences | Free-text summary of the structural reasons the indicator fired. |
| ⛓️ Cross-Strategy Confirmations | Only present when other indicators independently confirm this setup within the last 30 min and overlap the same entry zone. Each confirming strategy adds to the Boosted Tech Score (capped at 100%). |
| 🧠 AI Council | Two independent AI council members each score the setup 0–100%. The header value is the average. Bullet colour reflects the system view: 🟢 ≥ 75 strong · 🟡 60–74 marginal · 🔴 < 60. |
🎯 3. Split-Fill Execution Strategy
The Entry Zone is engineered specifically to be filled in two equal halves. This is the recommended execution for every signal:
| Leg | Size | Order type | Price |
|---|---|---|---|
| Leg 1 — Aggressive fill | 50% of position | Market order | At the outer edge of the zone (closer to current price). |
| Leg 2 — Patient fill | 50% of position | Limit order | At the inner edge of the zone (closer to SL). |
Worked example — BUY XAUUSD
Entry Zone: 2422.50 – 2426.00 | SL: 2415.00

├─ 🟢 Leg 1 — 50% MARKET at 2426.00
│    Risk per unit: 2426.00 − 2415.00 = 11.00 points
└─ 🟢 Leg 2 — 50% LIMIT at 2422.50
     Risk per unit: 2422.50 − 2415.00 = 7.50 points
     → Average entry across both legs: 2424.25
📊 4. The 5 Premium Strategies
Each Telegram signal lists the originating strategy in the Strategy: field. Knowing the strategy tells you the character of the trade — fast scalp vs. structural swing — so you can size and manage accordingly.
| Strategy | Timeframe | Technical premise | Historical Win Rate | System Weight |
|---|---|---|---|---|
| ProTips Standard Scalper | M15 | Change-of-Character market structure with FVG / Order-Block imbalance zones, graded by a 0–100 confluence score. | 63.6% | 20 |
| ProTips Supply & Demand | M5 | Impulse-defined supply/demand zones, graded on a 10-point quality score and traded on the first clean retest. | 65.1% | 22 |
| ProTips Wyckoff VSA | M15 | Volume Spread Analysis to detect accumulation/distribution behaviour (Spring, Upthrust, Shakeout). | 66.3% | 24 |
| ProTips FTR Confluence | M15 | Failure-to-Return (FTR) structures with Quasimodo (QML), engulfing, hidden-base, and VSA-effort confluences; first-time-back entries. | 85.7% | 35 |
| ProTips Trend Bar Failure | M15 | Trend Bar Failure pattern — high-momentum reversal traps that catch over-extended breakouts when momentum fails to follow through. | 67.6% | 26 |
All strategies trade XAUUSD on the FXCM feed. Win rates are the live "Est. Win Rate (TP1+)" figures from each indicator's TradingView performance dashboard (as of 2026-05-29) and update as more samples accrue.
When two strategies agree
If a second strategy independently fires on the same direction inside the same entry zone within 30 minutes, the Cross-Strategy Confirmation block is appended and the Boosted Tech Score jumps. Three-strategy network consensus adds a further +15 flat bonus and triggers the 🔥 NETWORK CONSENSUS ACTIVE flag — these are the highest-conviction setups the system can produce.
🛡️ 5. Risk Management & Trading Discipline (Mandatory)
Position sizing
- Risk 0.5%–1.0% of account equity per signal. Never more.
- XAUUSD moves fast and wide. A single oversized loss erases days of gains.
- The split-fill recommendation assumes both legs together total your normal risk — not one full position per leg.
Move SL to Break-Even when TP1 hits
When the Hub marks TP1 as filled, immediately:
- Close the Leg 1 portion (50%) at TP1, or let it ride if your broker supports partial closes.
- Move the stop on the remaining 50% to your blended average entry price (Break-Even).
- The remaining 50% is now a risk-free trade running toward TP2 / TP3.
Partial profit ladder
| Target | R:R (typical) | Action |
|---|---|---|
| TP1 | 1:0.5 – 1:1 | Close 50%. Move SL on remainder to BE. |
| TP2 | 1:1.5 – 1:2 | Close another 25%. Trail SL behind structure. |
| TP3 | 1:2.5 – 1:3+ | Let the final 25% run. |
🔄 6. Signal Lifecycle
Every signal moves through one of the following terminal states. The Hub updates the status in real time as price interacts with SL / TP levels.
Rendering diagram…
Hub status badges
| Status | Meaning |
|---|---|
| 🟦 Active | Live position. Price has not yet touched SL or any TP. |
| 🟩 Won | At least TP1 was hit. Remainder either ran further or closed at BE — net result is positive or flat. |
| 🟥 Lost | SL was hit before any TP. |
| ⬜ Cancelled | LIMIT order never filled within the valid window, or structure invalidated the setup. |
✅ Quick Reference Checklist
Before placing any ProTips signal, verify:
- You have read the Strategy and understand which playbook generated this signal.
- Your position size results in ≤ 1% account risk at SL.
- You have queued both legs of the split-fill (50% market + 50% limit).
- You are clear on the TP1 → move-to-BE rule.
- You will not move the Stop Loss to "save" the trade.
Trade systematically. Risk consciously. Compound patiently. — The ProTips team.